What is Vaadin?
Vaadin is a Java framework that allows users to build modern web applications, with customizable themes. The performance are optimized, which makes the application fast and reliable.
Vaadin’s main priorities are developer productivity, end-user experience and scalability. With a unique combination of building on JVM and HTML5, Vaadin helps you decrease development time, amount of errors and times hitting your head in the wall.
Vaadin is an open-source project, with a huge community. It’s distributed under Apache 2 license, which make it free to use by anybody, for any purpose.
To finish, Vaadin helps you to shave off 50% of your code. You don’t have to fight with browser incompatibilities and design ajax communication protocols. You just have to refactor your code in your favorite IDE just like you would with your services and business layer.
Liferay, a famous software that helps you develop great customer experiences and modernize business operations, is using Vaadin.
Why are Vaadin applications hard to script?
Unfortunately, Vaadin’s logic makes it rather complex to script.
Every requests sent to a Vaadin web application must contain some technical parameters, extracted from previous answers. If one of them is missing, or wrong, your script will fail as long as your load test.
Vaadin also provides a lot of features to secure applications, which is really great for production, but disturbing when you want to load test your application. These features can be disabled during your tests, but then the behavior that you will script won’t be the same as production behavior.
Introducing UbikLoadPack Auto-Correlator plugin
Luckily for you, we designed within our UbikLoadPack solution a JMeter plugin that will help you load very easily test your Vaadin applications !
UbikLoadPack Auto-correlator plugin will extract and inject every variable that need to be correlated on every request.
All the hard and boring work is done for you, just record and replay after modifying business variables !
What about a little example?
First get a valid license HERE.
Execute the preliminary configuration steps :
1 – Unzip bundle
- Unzip ubik-autocorrelator-plugin-XXX.zip.
- Copy lib/ext/ubik-jmeter-autocorrelator-plugin-X.X.X.jar to jmeter/lib/ext fold
2 – Record your script
On File menu, click on Templates … (or simply click on the shortcut), then select “Recording” and click “Create” :
On HTTP(S) Test Script Recorder, enter your configuration, then click on the Start button :
NB : if you have some trouble configuring the elements, you can refer on the JMeter official documentation.
After configuring your browser (see the link above), you can start recording your navigation. In this example, we will use this Vaadin application as a demo.
After recording your script, you can press the Stop button, and close your browser.
3 – Variabilize your script
The next step will be to delete unnecessary samplers, you just have to keep all the samplers related to your scenario.
You will have something like this :
Now it’s time to variabilize our samplers. To do this, firstly you can click on Thread Group -> Add -> Config Element -> CSV Data Set Config.
When your configuration is ready (click here if you need any help), you can start variabilizing the samplers.
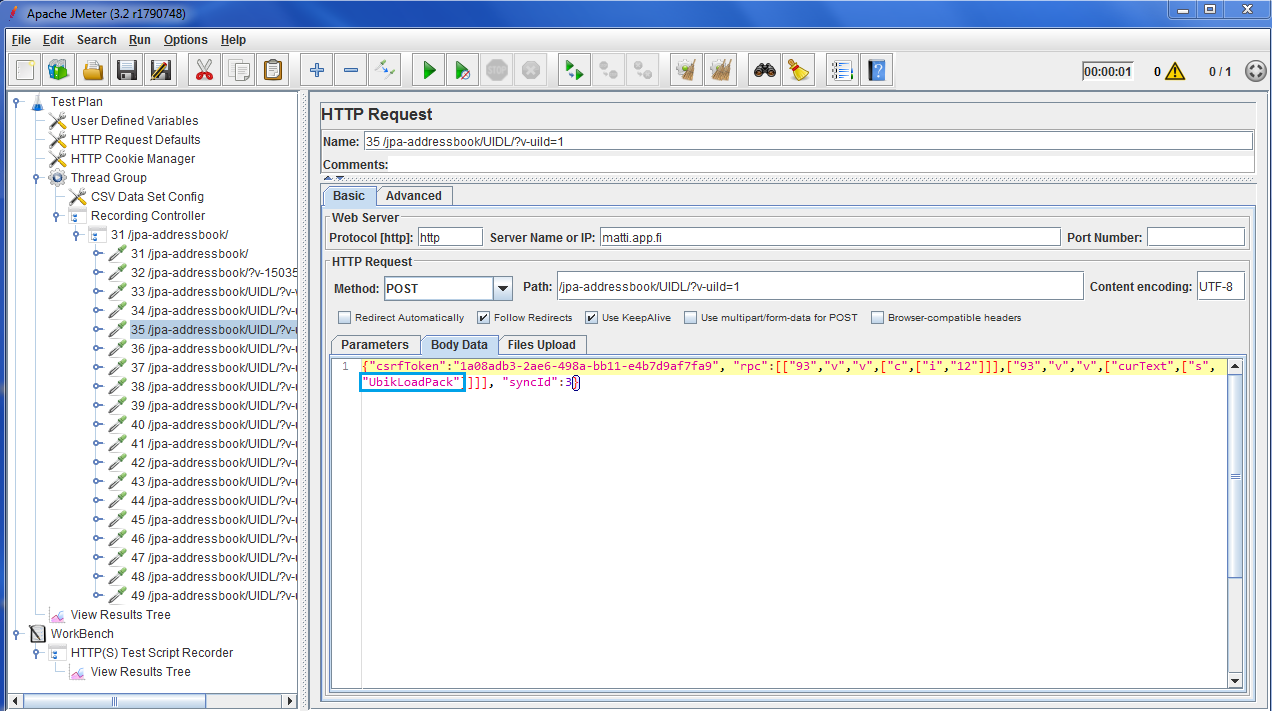
A typical Vaadin request will look like this in JMeter :
Here, we entered the name “UbikLoadPack” into the Name field. We can variabilize this by giving the reference to a column into the CSV :
You can do that with all the needed variables.
Now, there are only 2 more steps to run before you can start your load testing:
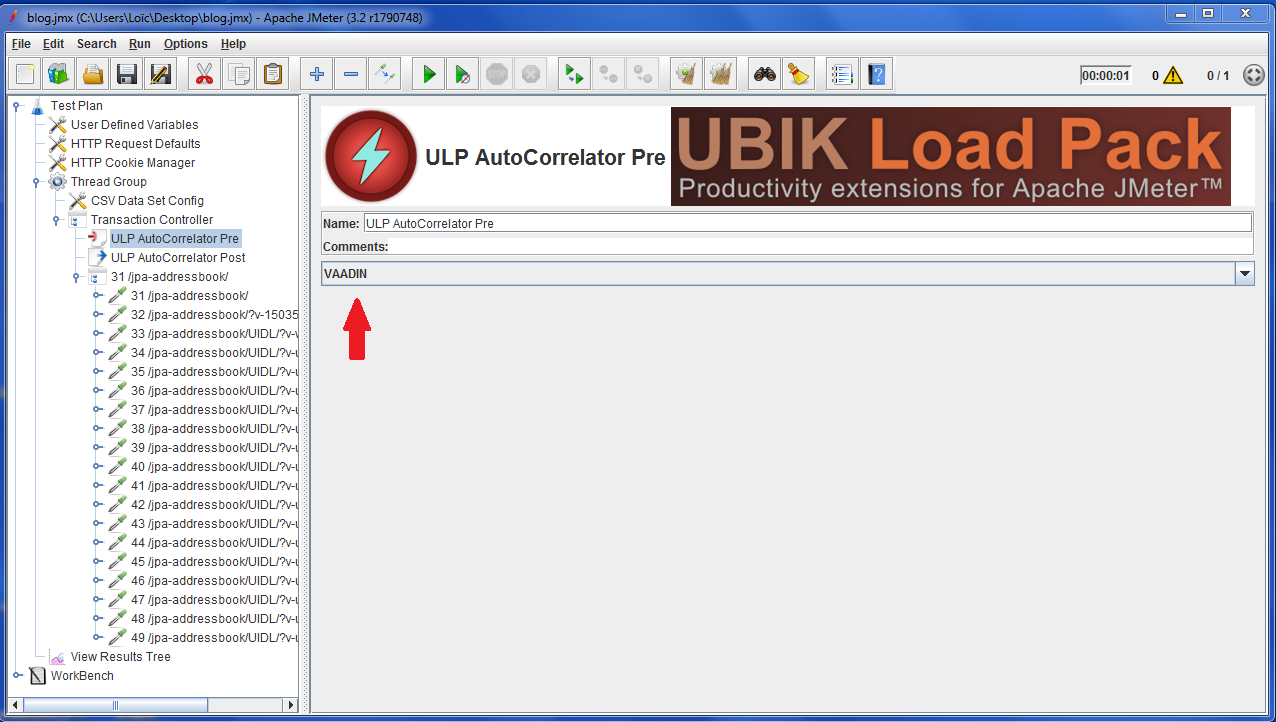
- Select Test Plan element and right click then select Add -> Pre Processors (Post Processors) -> ULP AutoCorrelator Pre
- Select Test Plan element and right click then select Add -> Post Processors (Post Processors) -> ULP AutoCorrelator Post
Then, on both of them, you can select the VAADIN technology :
4 – Check if an error occurs
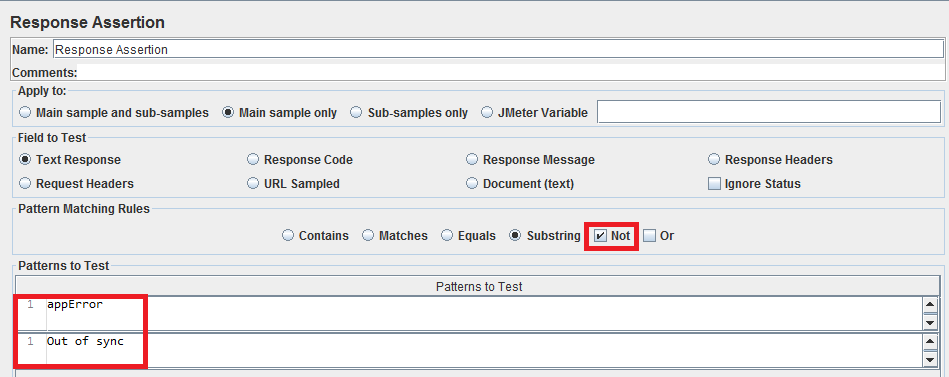
When an error occurs with Vaadin, the response code is still an HTTP/1.1 200 OK. To be aware if something went wrong, you can add a Response Assertion. To do this, right click on the Transaction Controller : Add -> Assertions -> Response Assertion
Then, add a pattern that does NOT contains “appError” and “Out of sync” :
5 – Launch your load test !
You’re ready to go! You can start your load test, correlation is automagically done by our plugin. You can now concentrate on diagnosing performance issues.
Synthesis
UbikLoadPack Auto-correlator plugin is a great feature for your Vaadin’s load testing. It will help you gain a considerable amount of time and create realistic load tests easily.
Here are the benefits you get with our solution:
- “Record & Play” solution : once your script is recorded, you will be able to launch your load test within few minutes !
- Big ROI on scripting
- Realistic load tests
- Maintainable solution as you don’t have to create a lot of extractors
- Light & performing plugin for JMeter
- Representative and trustworthy results
About us:
- Ubik Load Pack is a JMeter based solution for complex protocols.
- Follow us on Twitter and StackOverflow.
- Follow Apache JMeter on Twitter
Recent Posts
- UbikLoadPack Video Streaming Plugin 10.1.1 27 May 2025
- Understanding HLS Interstitials and EXT-X-DISCONTINUITY in Ad Insertion 20 February 2025
- How to setup ads insertion on video streaming with AWS Services 26 November 2024


