How to setup ads insertion on video streaming with AWS Services
This blog describes how to add Ads to a video or audio stream using HLS or DASH as format.
The tooling we will use for that is the following :
- OBS
- AWS IAM
- AWS Elemental Media Live
- AWS Elemental Media Package
- AWS Elemental Media Tailor
OBS
OBS is free and open source video recording and live streaming software.
We use this software to simulate a video stream easily by sharing our screen. But you can use whatever solution of the market for your input stream.
AWS Services
To setup Ads insertion, you can use the following AWS services :
- AWS Elemental Media Live : live video processing service that creates streams
- AWS Elemental MediaPackage : convert a stream into different formats
- AWS Elemental MediaTailor : adds advertising to a stream
IAM roles
To make the configuration of this tutorial, your AWS account must have the following roles :
- CreateRole
- GetRole
- AwsElementalMediaLiveFullAccess
- AWSElementalMediaPackageFullAccess
- AWSElementalMediaTailorFullAccess
- CreateServiceLinkedRole
Create AWS Elemental MediaPackage channel
From AWS MediaPackage documentation, a channel holds all the information that AWS Elemental MediaPackage (MediaPackage) requires to receive a live content stream from a source such as AWS Elemental MediaLive or another encoder.
The channel receives content, and after packaging it, outputs it through an endpoint to downstream devices (such as video players or CDNs) that request the content.
To summarize, a channel takes an input stream as a parameter and transforms it.
The first step is to create a mediapackage channel.
Here are the steps involved :
- Go to AWS Elemental MediaPackage console
- Click on the “create channel” button in the top right-hand corner
- Complete all the fields on the form and click on create
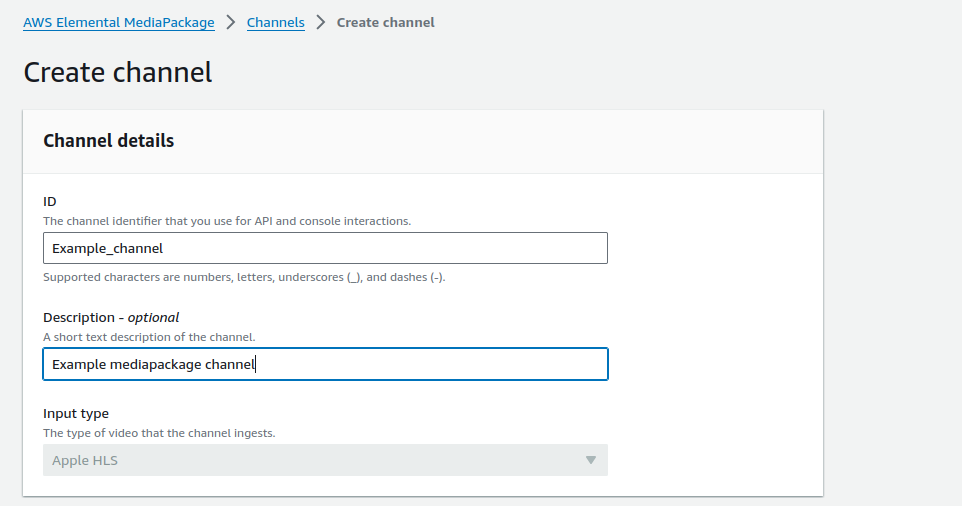
The second step is to define the type of stream we want (HLS, DASH, Smooth)
On the list of channels, click on the name of the channel created in the previous step, you will arrive on the page below
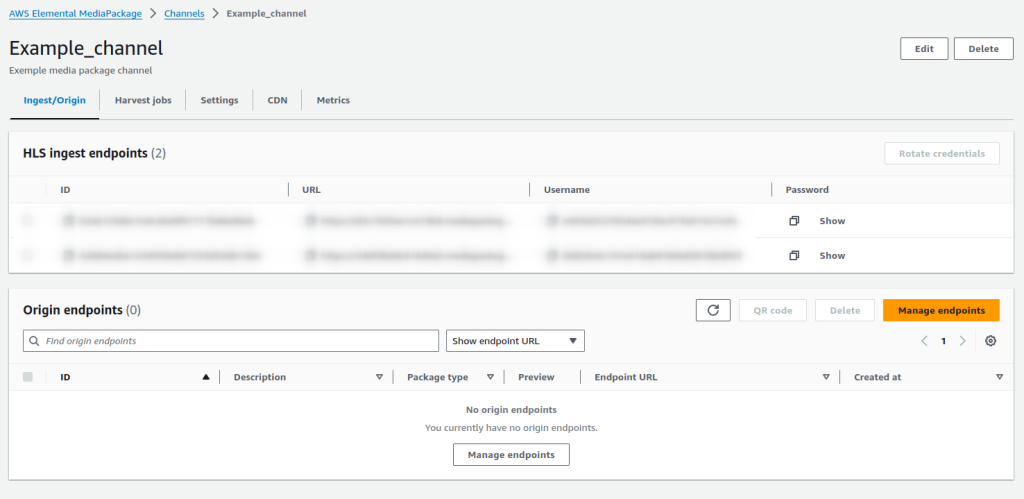
Click on manage endpoint to create a new endpoint (an endpoint can be assimilated to a type of stream).
Complete all the fields :
- id : a unique identifier
- description : description of the endpoint
- Manifest name : the name of the manifest (append at the end of the URL) : in our case manifest
- Packaging type : the stream type (HLS, DASH, Smooth)
- Segment duration : the chunk duration in seconds
For HLS, click on additional configuration and select SCTE-35 enhanced for ad markers field
For DASH , click on additional configuration and select Trigger new periods on ads
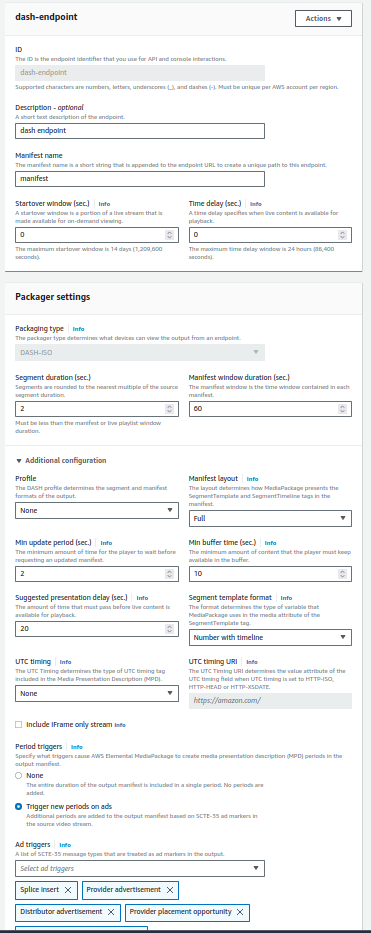
After creating the endpoint, the manifest can be retrieved using the URL displayed
Create AWS Elemental MediaLive input
You can find a diagram about MediaLive.
MediaLive input is used to receive the content of the source, in the case of this tutorial the video and audio from OBS.
From AWS documentation , An input is a video asset that is to be transcoded and packaged.
To setup an input, follow these steps :
- Go to AWS Elemental MediaLive console
- On the left menu click on “Inputs”
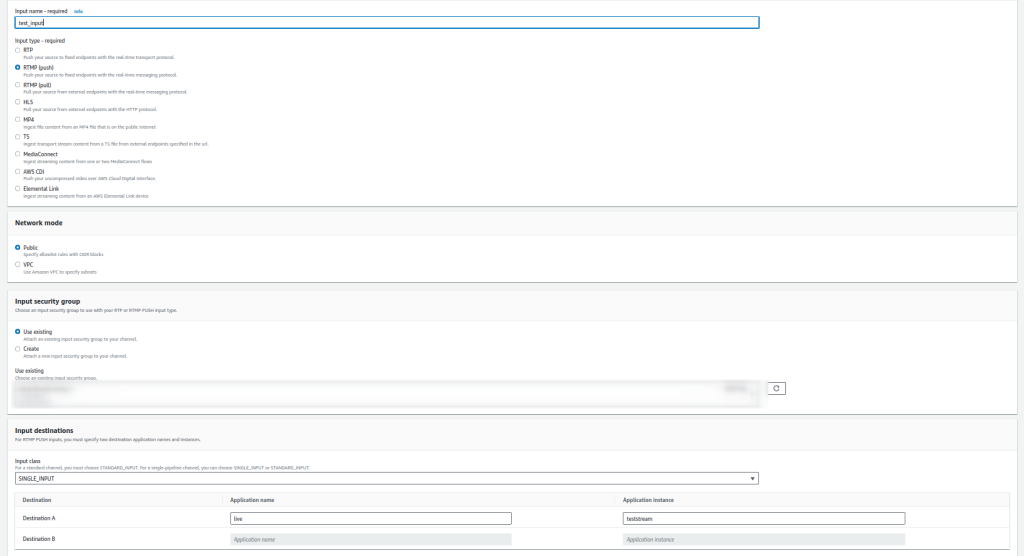
- Complete all the fields :
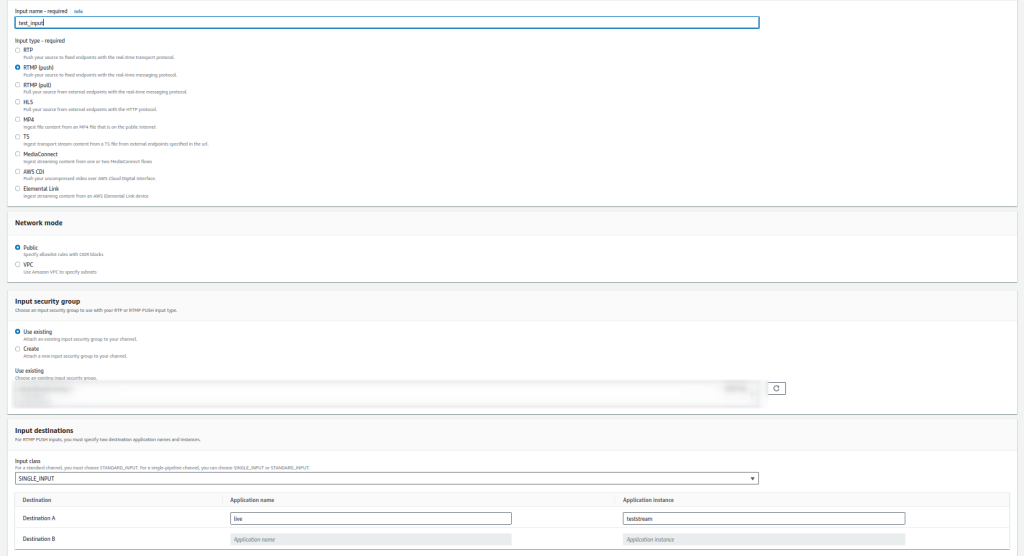
- input name : the input name
- input type : the input type (in case of OBS we used RTMP push)
- security group : the security group (you can create a new security group or used an existing one)
- input destination :
- input class : choose single input
- destination A :
- application name : the application name
- application instance : the application instance (in case of OBS the field value will be reused later)
Create AWS Elemental MediaLive channel
From AWS Elemental MediaLive documentation : A channel ingests and transcodes (decodes and encodes) source content from the inputs that are attached to the MediaLive channel, and packages the new content into outputs. You create and configure the channel with the details that instruct the channel how to perform this processing.
To summarize MediaLive channel can be compared to a transformer, it takes a stream as a parameter and transforms it, in our case, the output will be an HLS stream.
- Go to AWS Elemental MediaLive console
- On the left menu click on “Channels”
- Click on Create channel
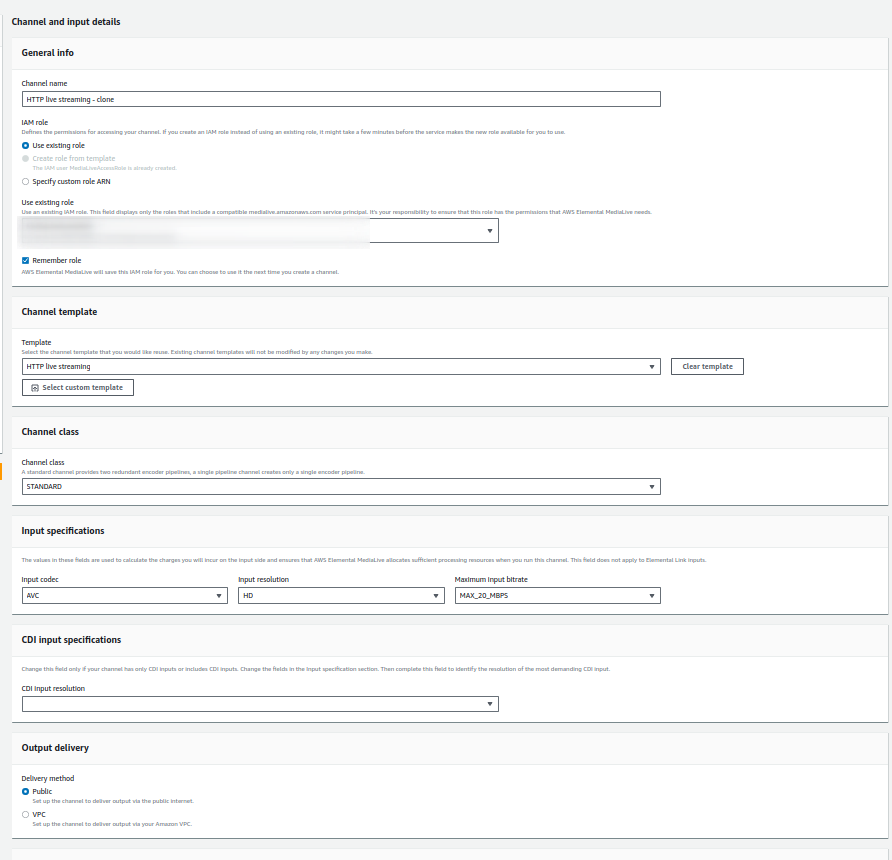
- Complete all the fields :
- Channel name : the unique channel name
- IAM role : select Create role from template and AWS will create an IAM role for you with the necessary access rights
- Template : select HTTP Live Streaming HLS not the one ending with mediapackage
- Channel class : select SINGLE_PIPELINE
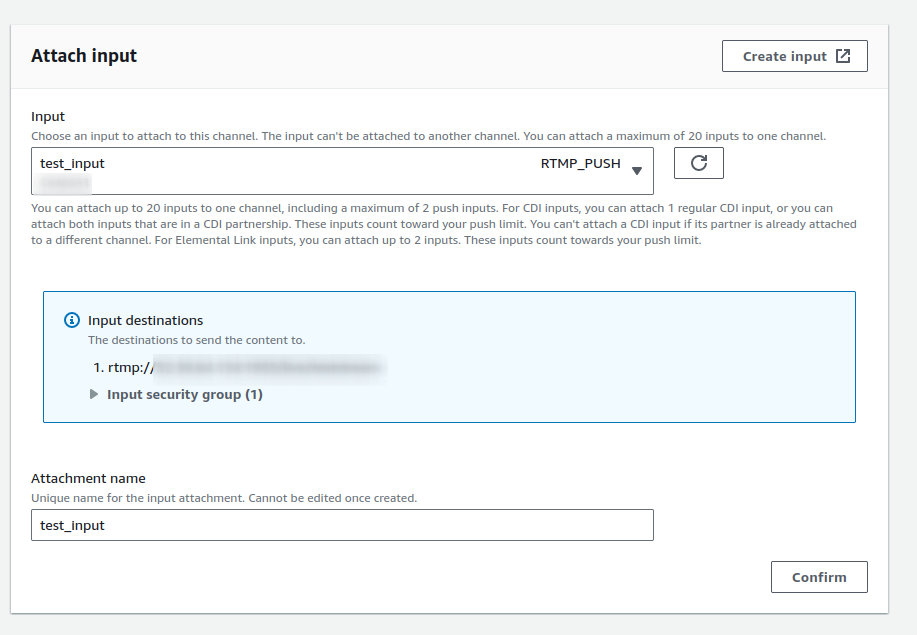
On the left menu, select “add” next to input attachment
Select input create in the previous step
On the left menu, click on TN2224 (HLS) below output groups
Complete all the fields
URL : enter one of the URL from mediapackage
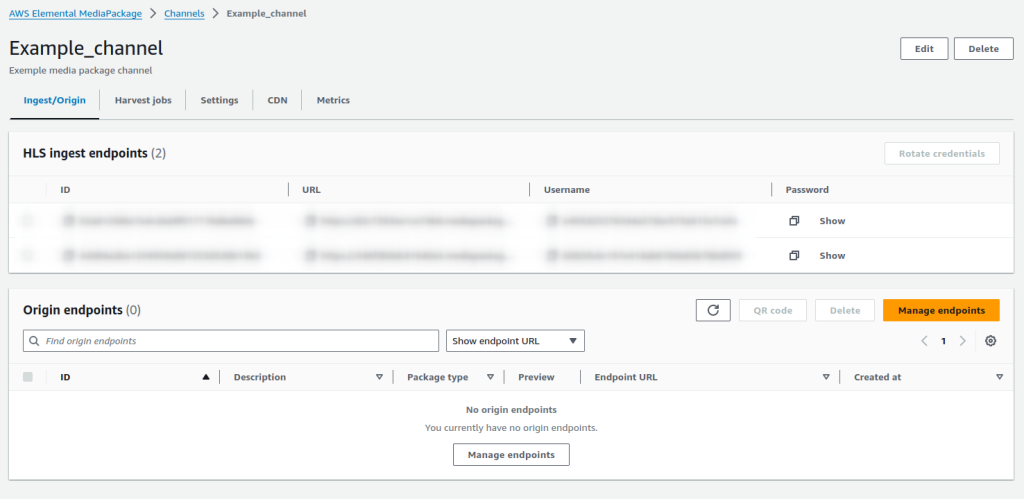
- Username : copy username from mediapackage (column username from the capture below)
- Password : select Create parameter :
- Name : enter the parameter name (like my_secret)
- Password value : copy password from mediapackage (column password from the capture below)
- Go to Ad Marker section :
- Click on Add ad marker
- Select ELEMENTAL
- Password : select Create parameter :
Use media live schedule for ads insertion
Here is an article about SCTE-35.
With mediaLive, SCTE-35 markers can be added using a schedule.
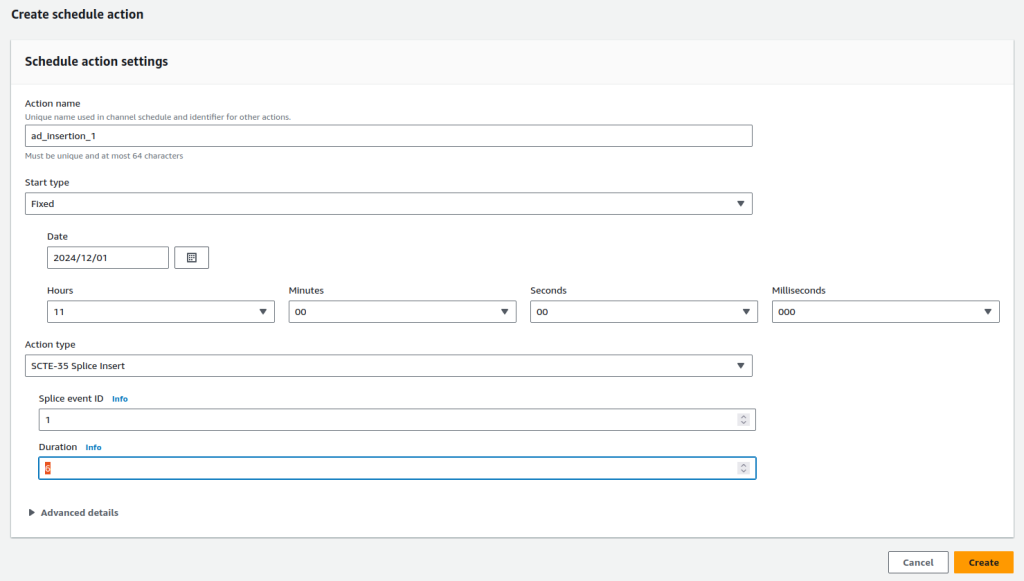
For example, you can add a 6-second break from 01 December 2024 at 11:00 am.
Let’s see how to do it :
- Go to AWS Elemental MediaLive console
- On the left menu click on “Channel”
- Click on the name of the channel concerned
- Click on schedule tab
- Click on create button
- Complete all the fields :
- action name : the unique action name (for example ad_insertion_1)
- start type : in our case select fixed :
- fixed : at a given date
- follow : after another action
- immediate : immediately after saving schedule
- Date : the start date of the schedule
- Hours – minutes – seconds – milliseconds : start time of the schedule
- Action type : the action type of the schedule, in our case select SCTE-35 Splice Insert :
- Splice event ID : the unique identifier of the event
- Duration : the duration of the ads
Configure AWS Elemental MediaTailor
From AWS Elemental MediaTailor documentation : AWS Elemental MediaTailor is a channel assembly and personalized ad-insertion service for over-the-top (OTT) applications.
The purpose of AWS Elemental MediaTailor is to allow for OTT applications to monetize their service with personal advertising.
MediaTailor ad insertion supports HLS and DASH streams for live and video on demand services.
To summarize, mediatailor is useful for replacing ad markers with real video chunks.
You can find a diagram about MediaTailor
- Go to AWS Elemental MediaTailor console
- Click on Create configuration
- Complete all the fields :
- Name : configuration name (useful for building the URL of the final manifest)
- Content source : The URL of the manifest from mediapackage endpoint minus the manifest name (for example if endpoint URL is https://f7654321.mediapackage.eu-west-1.amazonaws.com/out/v1/123456/index.m3u8 the content source must be https://f7654321.mediapackage.eu-west-1.amazonaws.com/out/v1/123456/)
- Ad decision server : the URL of the ad decision server (you can find a list of free ad decision server here https://developers.google.com/interactive-media-ads/docs/sdks/html5/tags)
How to retrieve the manifest URL
- Go to AWS Elemental MediaTailor console
- Click on the configuration
- The list of URLs is displayed, you need to add a suffix depending on the type of stream :
- DASH : /manifest.mpd
- HLS : /master.m3u8

Configure OBS
- Launch OBS
- Go to File > Settings
- Select Stream tabs
- Complete all the fields :
- Server : copy the destination from mediaLive input without suffix for example if destination A equals rtmp://12.345.67.89:1234/live/stream_plugin server must be rtmp://12.345.67.89:1234/live

- Stream key : the stream name (application instance from the capture below)
Select Output tabs
- Encoder = x264
- Select Rescale Output box and type 1920×1080
- Bitrate = 1000 Kbps
- Click on apply button
Launch stream
- Go to AWS Elemental MediaLive console
- On the left menu click on “Channels”
- Select your channel and click on Start button
About UbikLoadPack :
- Ubik Load Pack is used by Big players in the Video streaming field
- We provide professional services for Load Testing
- Learn more about our streaming plugin
- Detailed features of UbikLoadPack Streaming Solution
- Get a Free trial
You’ll probably also like:
Recent Posts
- UbikLoadPack Video Streaming Plugin 10.1.1 27 May 2025
- Understanding HLS Interstitials and EXT-X-DISCONTINUITY in Ad Insertion 20 February 2025
- How to setup ads insertion on video streaming with AWS Services 26 November 2024

