

Running Video Streaming Load Test with Taurus, JMeter and UbikLoadPack
Taurus is a new tool that aims at automating and improving experience with popular testing tools like Selenium, JMeter and other Open Source load test tools.
In this blog, we’ll show how to setup a video streaming load test with UbikLoadPack plugin for JMeter and Taurus.
The benefits we get from it here are the following:
- We configure the Manifest URL, the duration in the YAML file
- We configure the load plan (Duration, number of threads, arrival) in the YAML file with friendly syntax
- It automatically downloads JMeter and required plugins
- It provides a read only Live simple Report without need for a system GUI (No Display on Linux machines for example)
- It provides a customizable Live web report with richer information available at Blazemeter
- We can generate the JMeter report enhanced with UbikLoadPack metrics with some customization at end of Load Test
- We can then easily automate the load test using Jenkins, Bamboo and other Taurus integrations
The Video Streaming simulator
At UbikLoadPack we pay particular attention to performances and test coverage of our plugins.
In order to fine tune and test thoroughly our video streaming plugin, we have developed a Mock server that delivers Live and VOD streams.
We’ll use it here to demonstrate the Taurus setup.
Pre-requisites
To run what is described below:
- go into that directory
The JMeter test plan
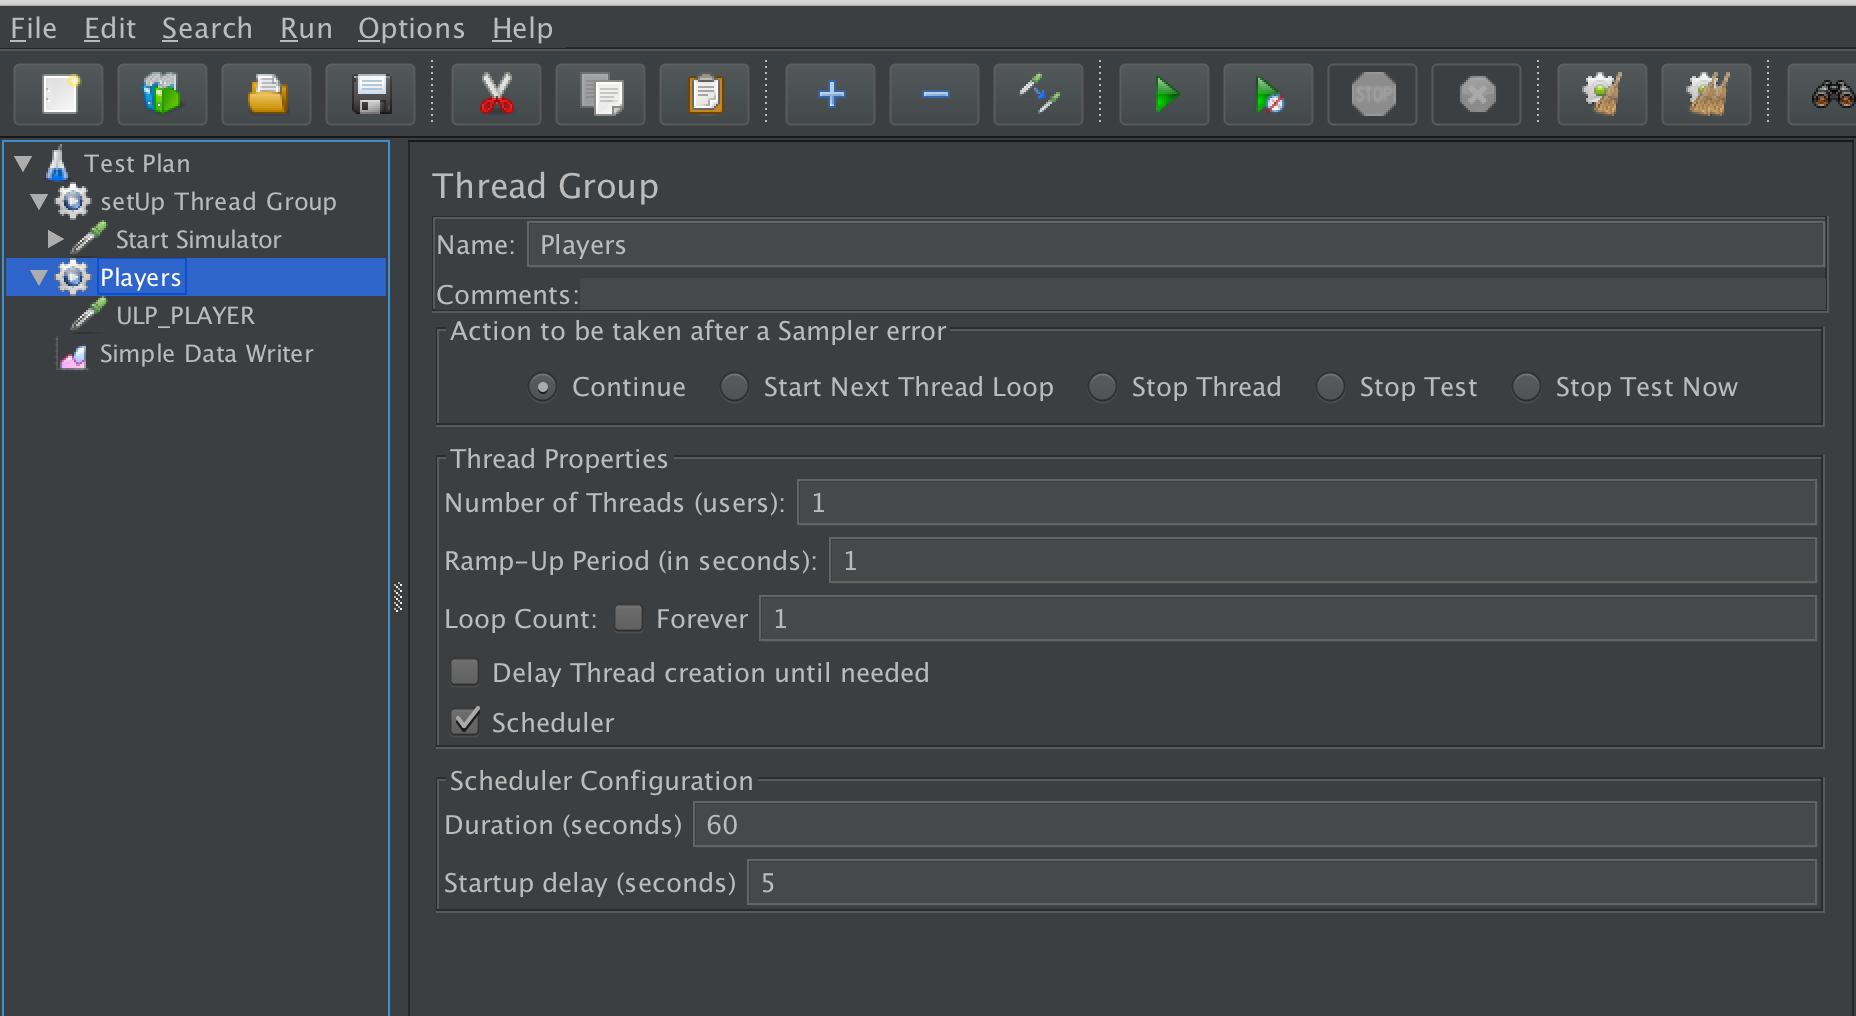
We’ll use a very simple test plan :
Note that we don’t configure anything in Thread Group regarding Users Arrival and schedule as it will be done in Taurus YAML file
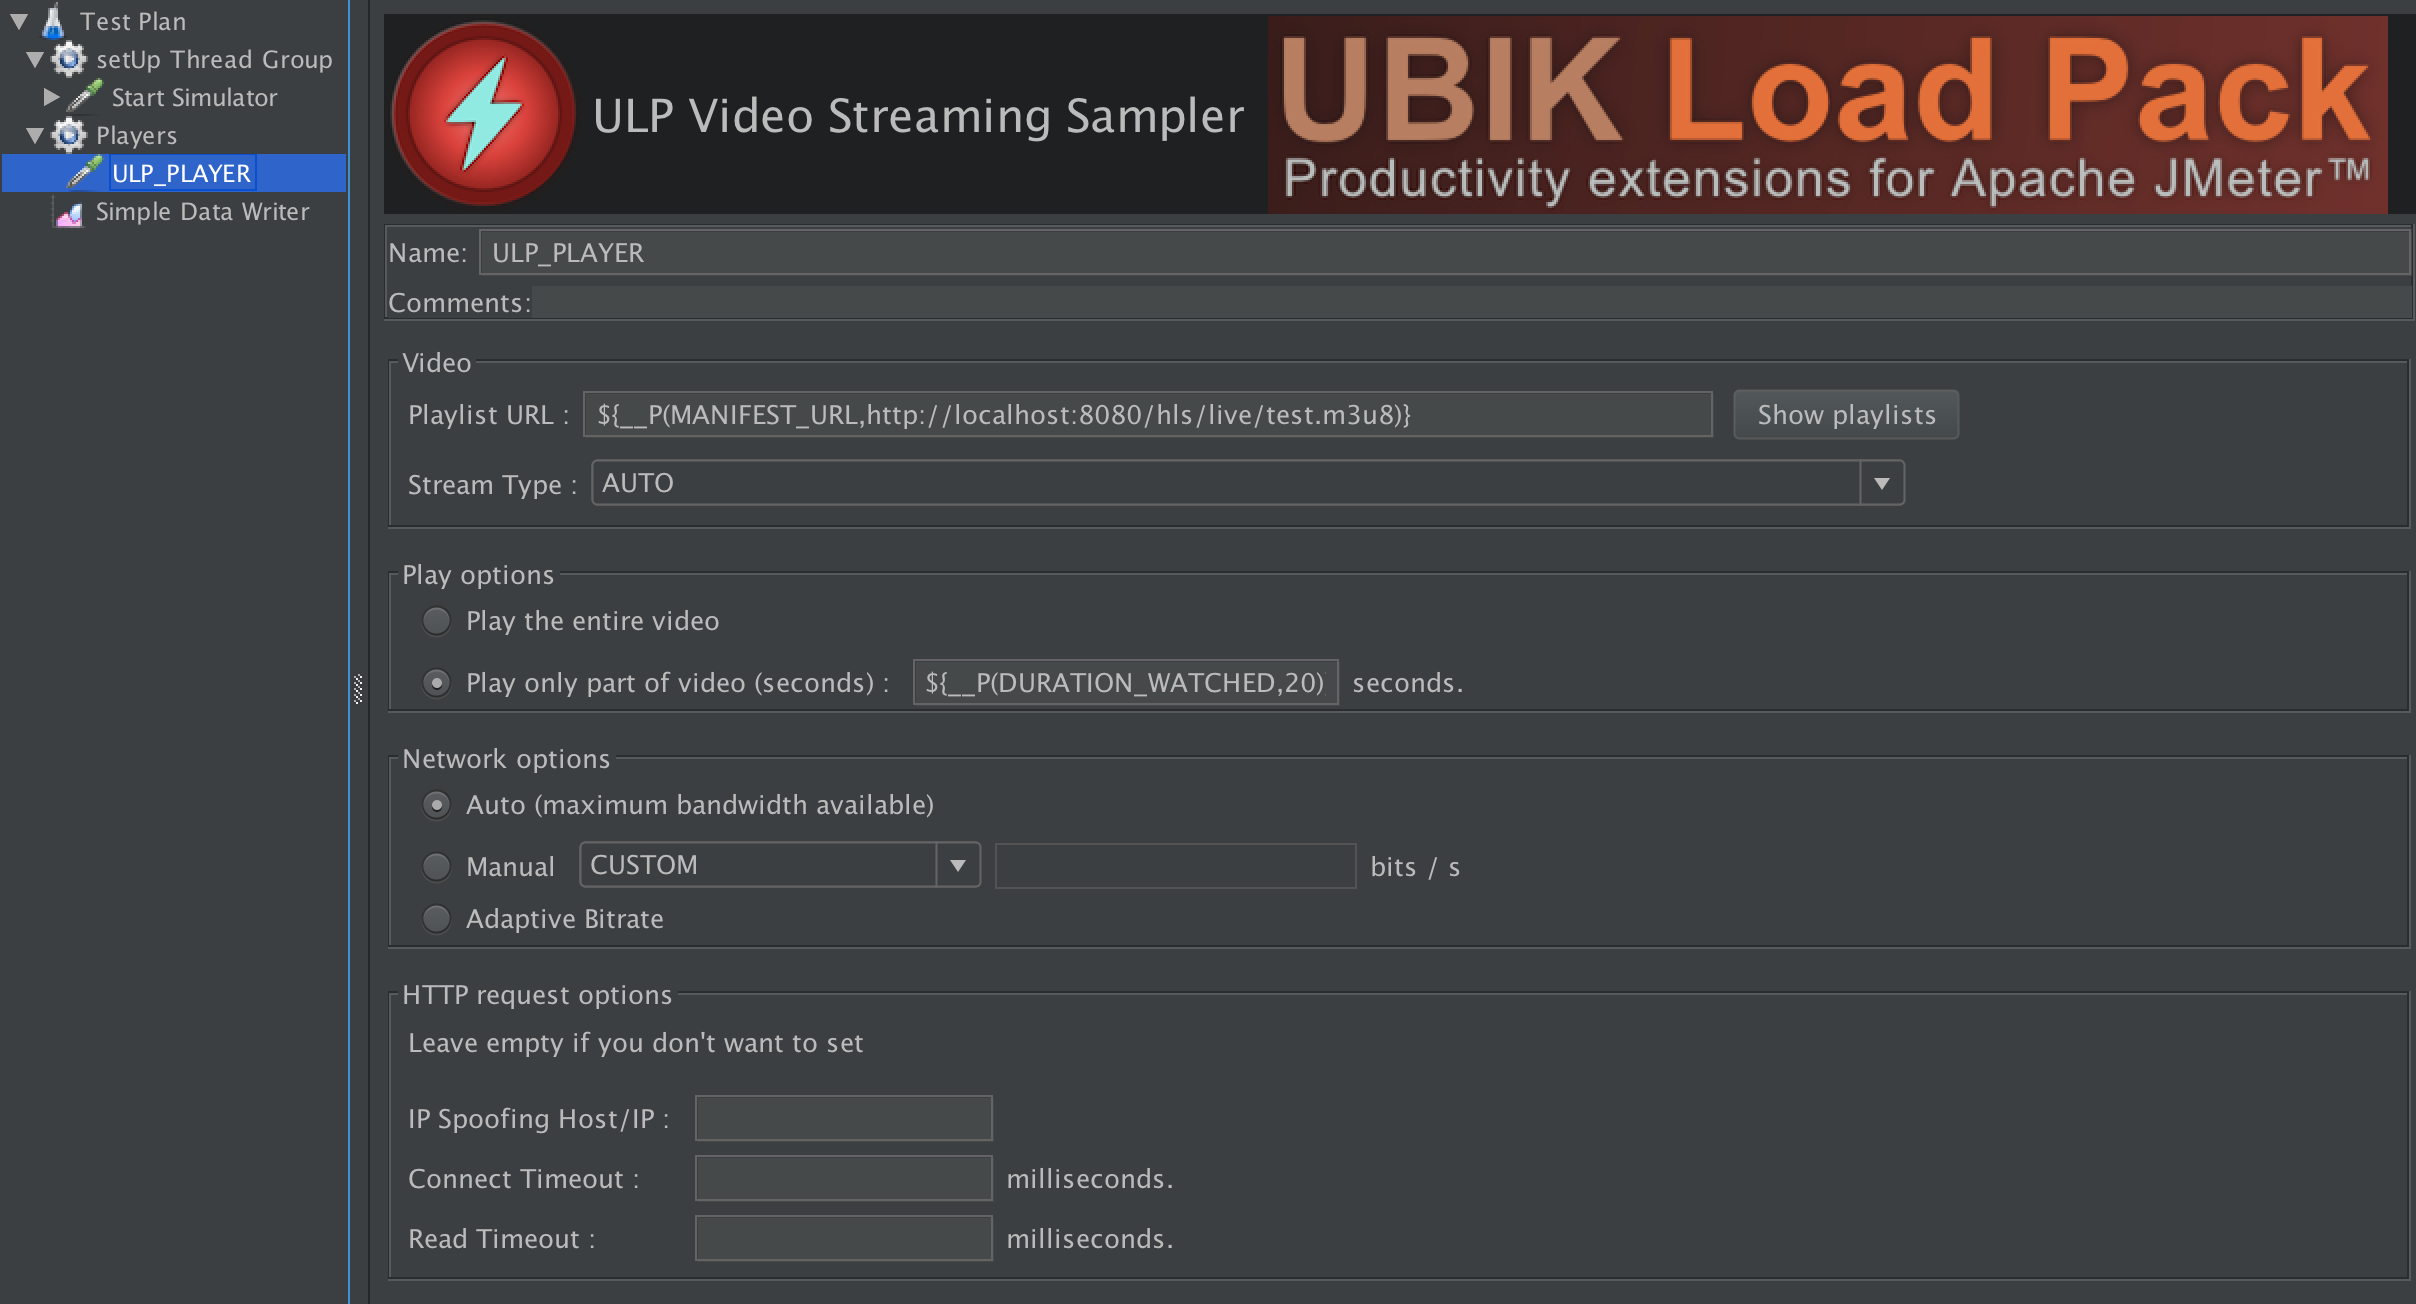
In UbikLoadPack streaming sampler we just enter the HLS Manifest URL (we use a property MANIFEST_URL to be able to modify it from outside of JMeter, it defaults to our Mock server “http://localhost:8080/hls/live/test.m3u8“) and set the duration we want to read (we also use a property DURATION_WATCHED with default value of 20 seconds here):
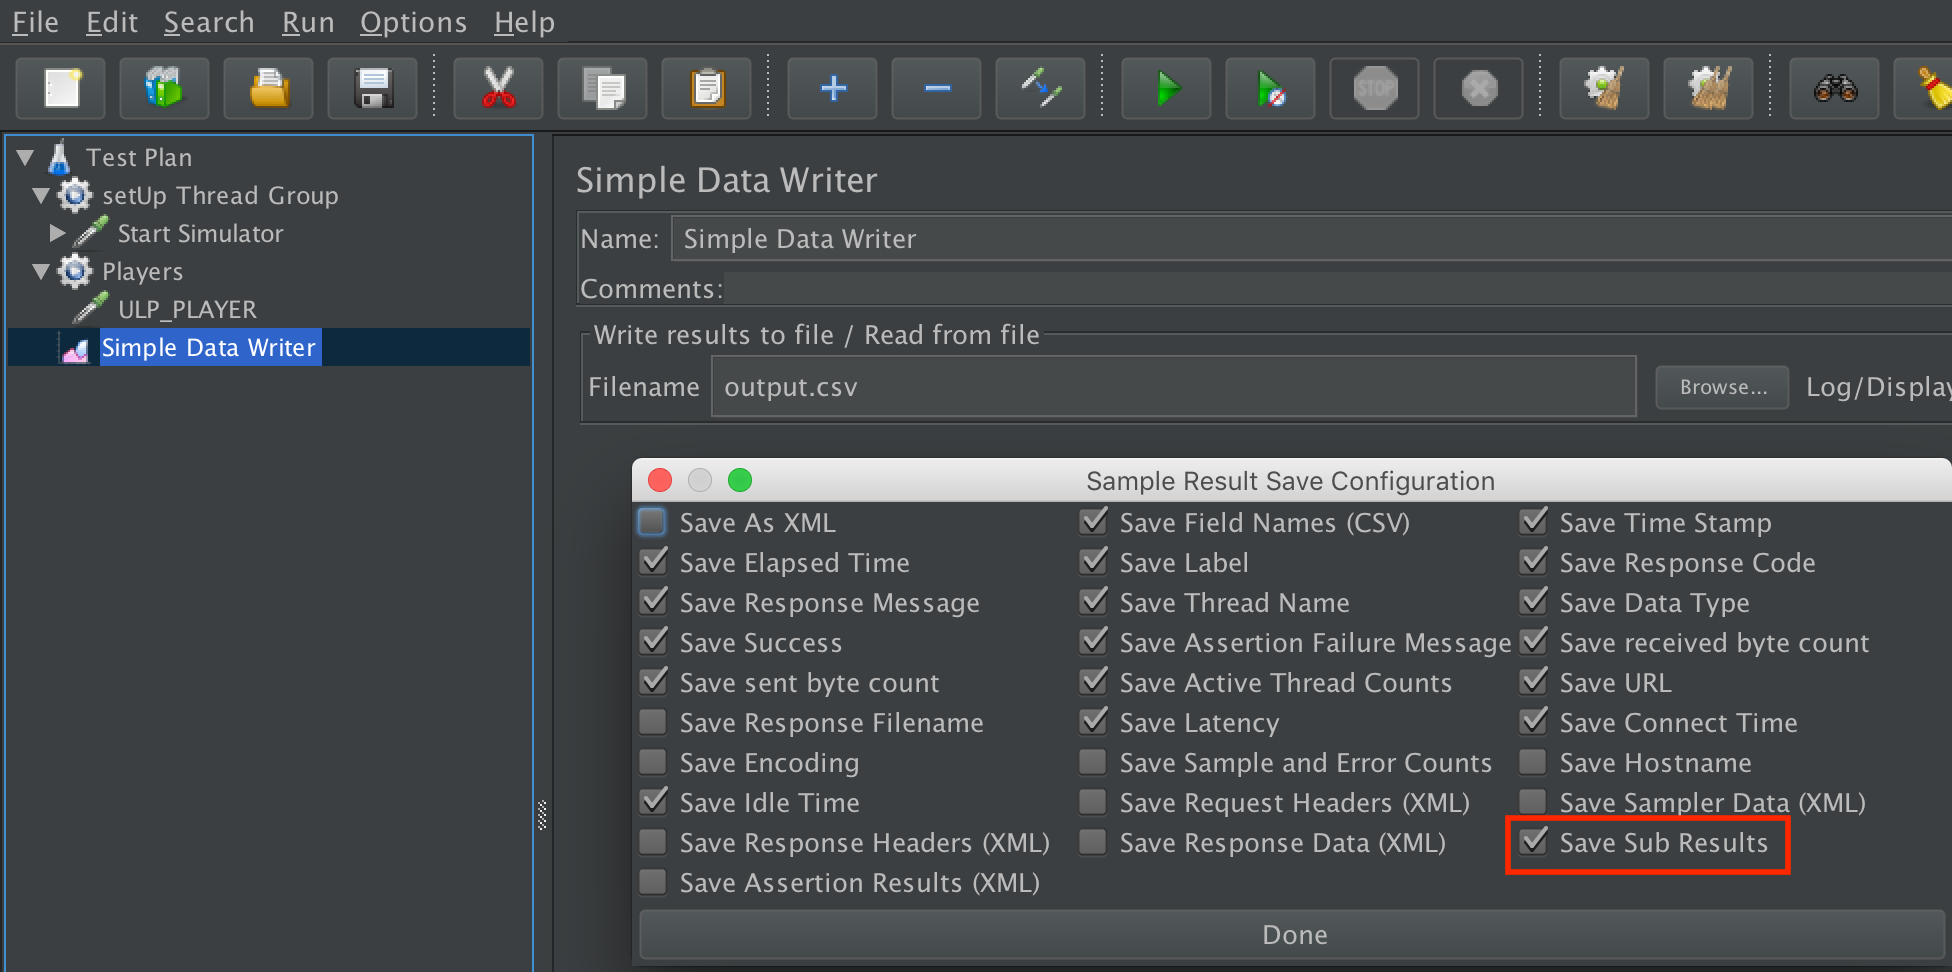
Finally note we setup a Simple Data Writer to output UbikLoadPack additional metrics :
Taurus Setup
The setup is done in YAML syntax, we’ll call it ubikloadpack-vs.yml.
We first configure how test will be executed, here we’ll run the existing JMX file called ulp_video_streaming_demo.jmx with 3 Virtual Users (as trial is limited to this number of threads) ramping up from 1 to 3 in 30 seconds and holding the load for 5 minutes:
execution:
- scenario: existing
  concurrency: 3
  hold-for: 5m
  ramp-up: 30s
scenarios:
  existing:
    script: ulp_video_streaming_demo.jmx
We then tell Taurus which JMeter version to use, note we’re JMeter 5.0 as we want to use new sexy features:
- Ability to graph over time additional metric, we need this feature to graph UbikLoadPack custom video metrics
We configure it this way:
settings:
  env:
     JMETER_VERSION: "5.0"
modules:
   jmeter:
      detect-plugins: false
Finally we set some properties specific to our test:
properties:
           # Change this for your real URL

           MANIFEST_URL: http://localhost:8080/hls/live/test.m3u8

           # Duration of video watched in seconds

           DURATION_WATCHED: 10
           ULP.videostreaming.licensepath: ubik-streaming-plugin.license
           sample_variables:    ulp_buffer_fill,ulp_lag_time,ulp_play_time,ulp_lag_ratio,ulp_dwn_time,ulp_hits,ulp_avg_chunk_time,ulp_avg_manifest_time
The whole YAML file can be downloaded from github project.
We finally need to put the following files in the same folder as YAML file:
- ubik-jmeter-videostreaming-plugin-6.3.2.jar (the plugin jar from Trial bundle)
- ubik-streaming-plugin.license (the license file from Trial request)
- ulp_video_streaming_demo.jmx (the JMeter test plan from )
- saveservice.properties (this file is modified by the plugin on installation)
(*) the files in bold are already in the github project
(**) the files in italic are available from trial
Testing your own Video Streaming servers
If you want to test your own servers, just replace in YAML file the MANIFEST_URL property by your manifest URL.
Running the test
To have fun here, we’ll change the number of simulated Threads to 250 and make a run.
To run the test we just do:
bzt ubikloadpack-vs.yml
Here is the output we get:
22:51:14 INFO: Taurus CLI Tool v1.13.0
22:51:14 INFO: Starting with configs: ['ubikloadpack-vs.yml']
22:51:14 INFO: Configuring...
22:51:14 INFO: Artifacts dir: /data/ubik/ulp/taurus/2018-08-05_22-51-14.149950
22:51:14 INFO: Preparing...
22:51:14 INFO: Will install JMeter into /Users/PhilM/.bzt/jmeter-taurus
22:51:14 INFO: Downloading: https://ci.apache.org/projects/jmeter/nightlies/r1840174/apache-jmeter-r1840174.zip
100% [===========================================================================================================================================] Time: 0:00:43
22:51:57 INFO: Unzipping /var/folders/72/68dyl2ns1q37l4f0p5yfmg4w0000gn/T/tmpMG6UzY.zip to /Users/PhilM/.bzt/jmeter-taurus
22:52:00 INFO: Downloading jmeter-plugins-manager-1.1.jar from https://search.maven.org/remotecontent?filepath=kg/apc/jmeter-plugins-manager/1.1/jmeter-plugins-manager-1.1.jar
22:52:01 INFO: Downloading cmdrunner-2.2.jar from https://search.maven.org/remotecontent?filepath=kg/apc/cmdrunner/2.2/cmdrunner-2.2.jar=========] ETA:  0:00:00
100% [===========================================================================================================================================] Time: 0:00:01
22:52:02 INFO: Installing JMeter plugins: jpgc-casutg,jpgc-dummy,jpgc-ffw,jpgc-fifo,jpgc-functions,jpgc-json,jpgc-perfmon,jpgc-prmctl,jpgc-tst
22:52:12 INFO: Starting...
22:52:12 INFO: Waiting for results...
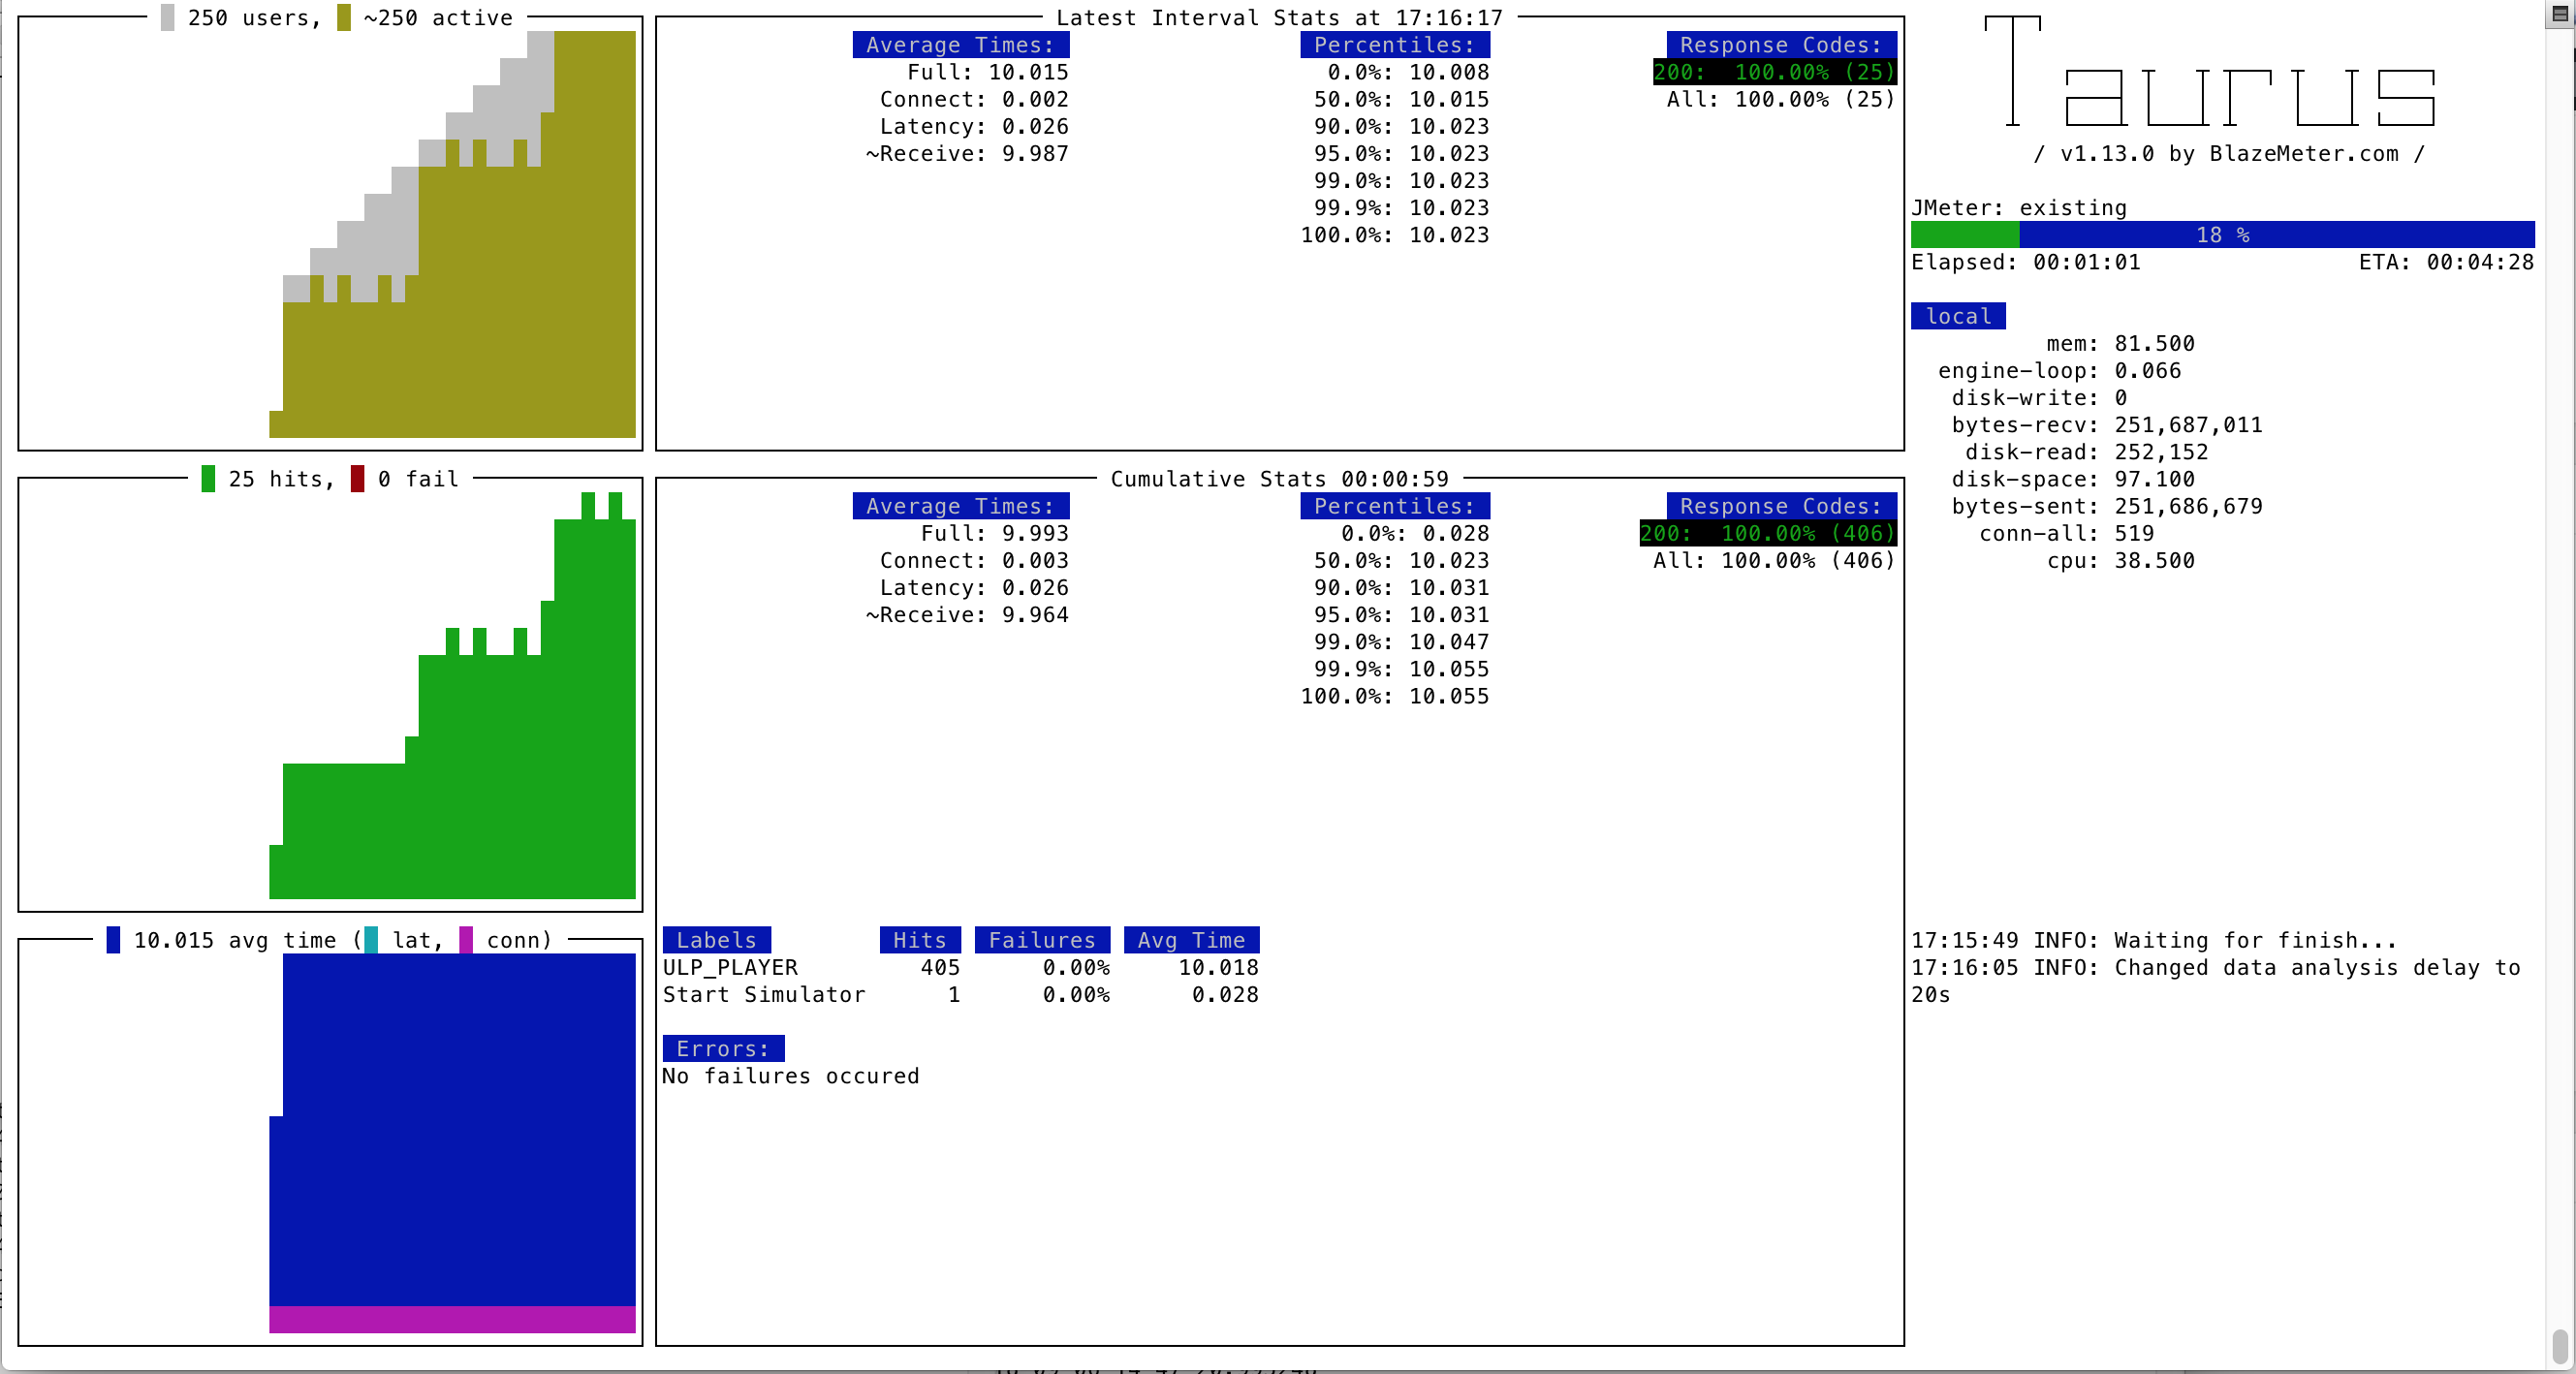
Then we can see test progress through a Text UI:
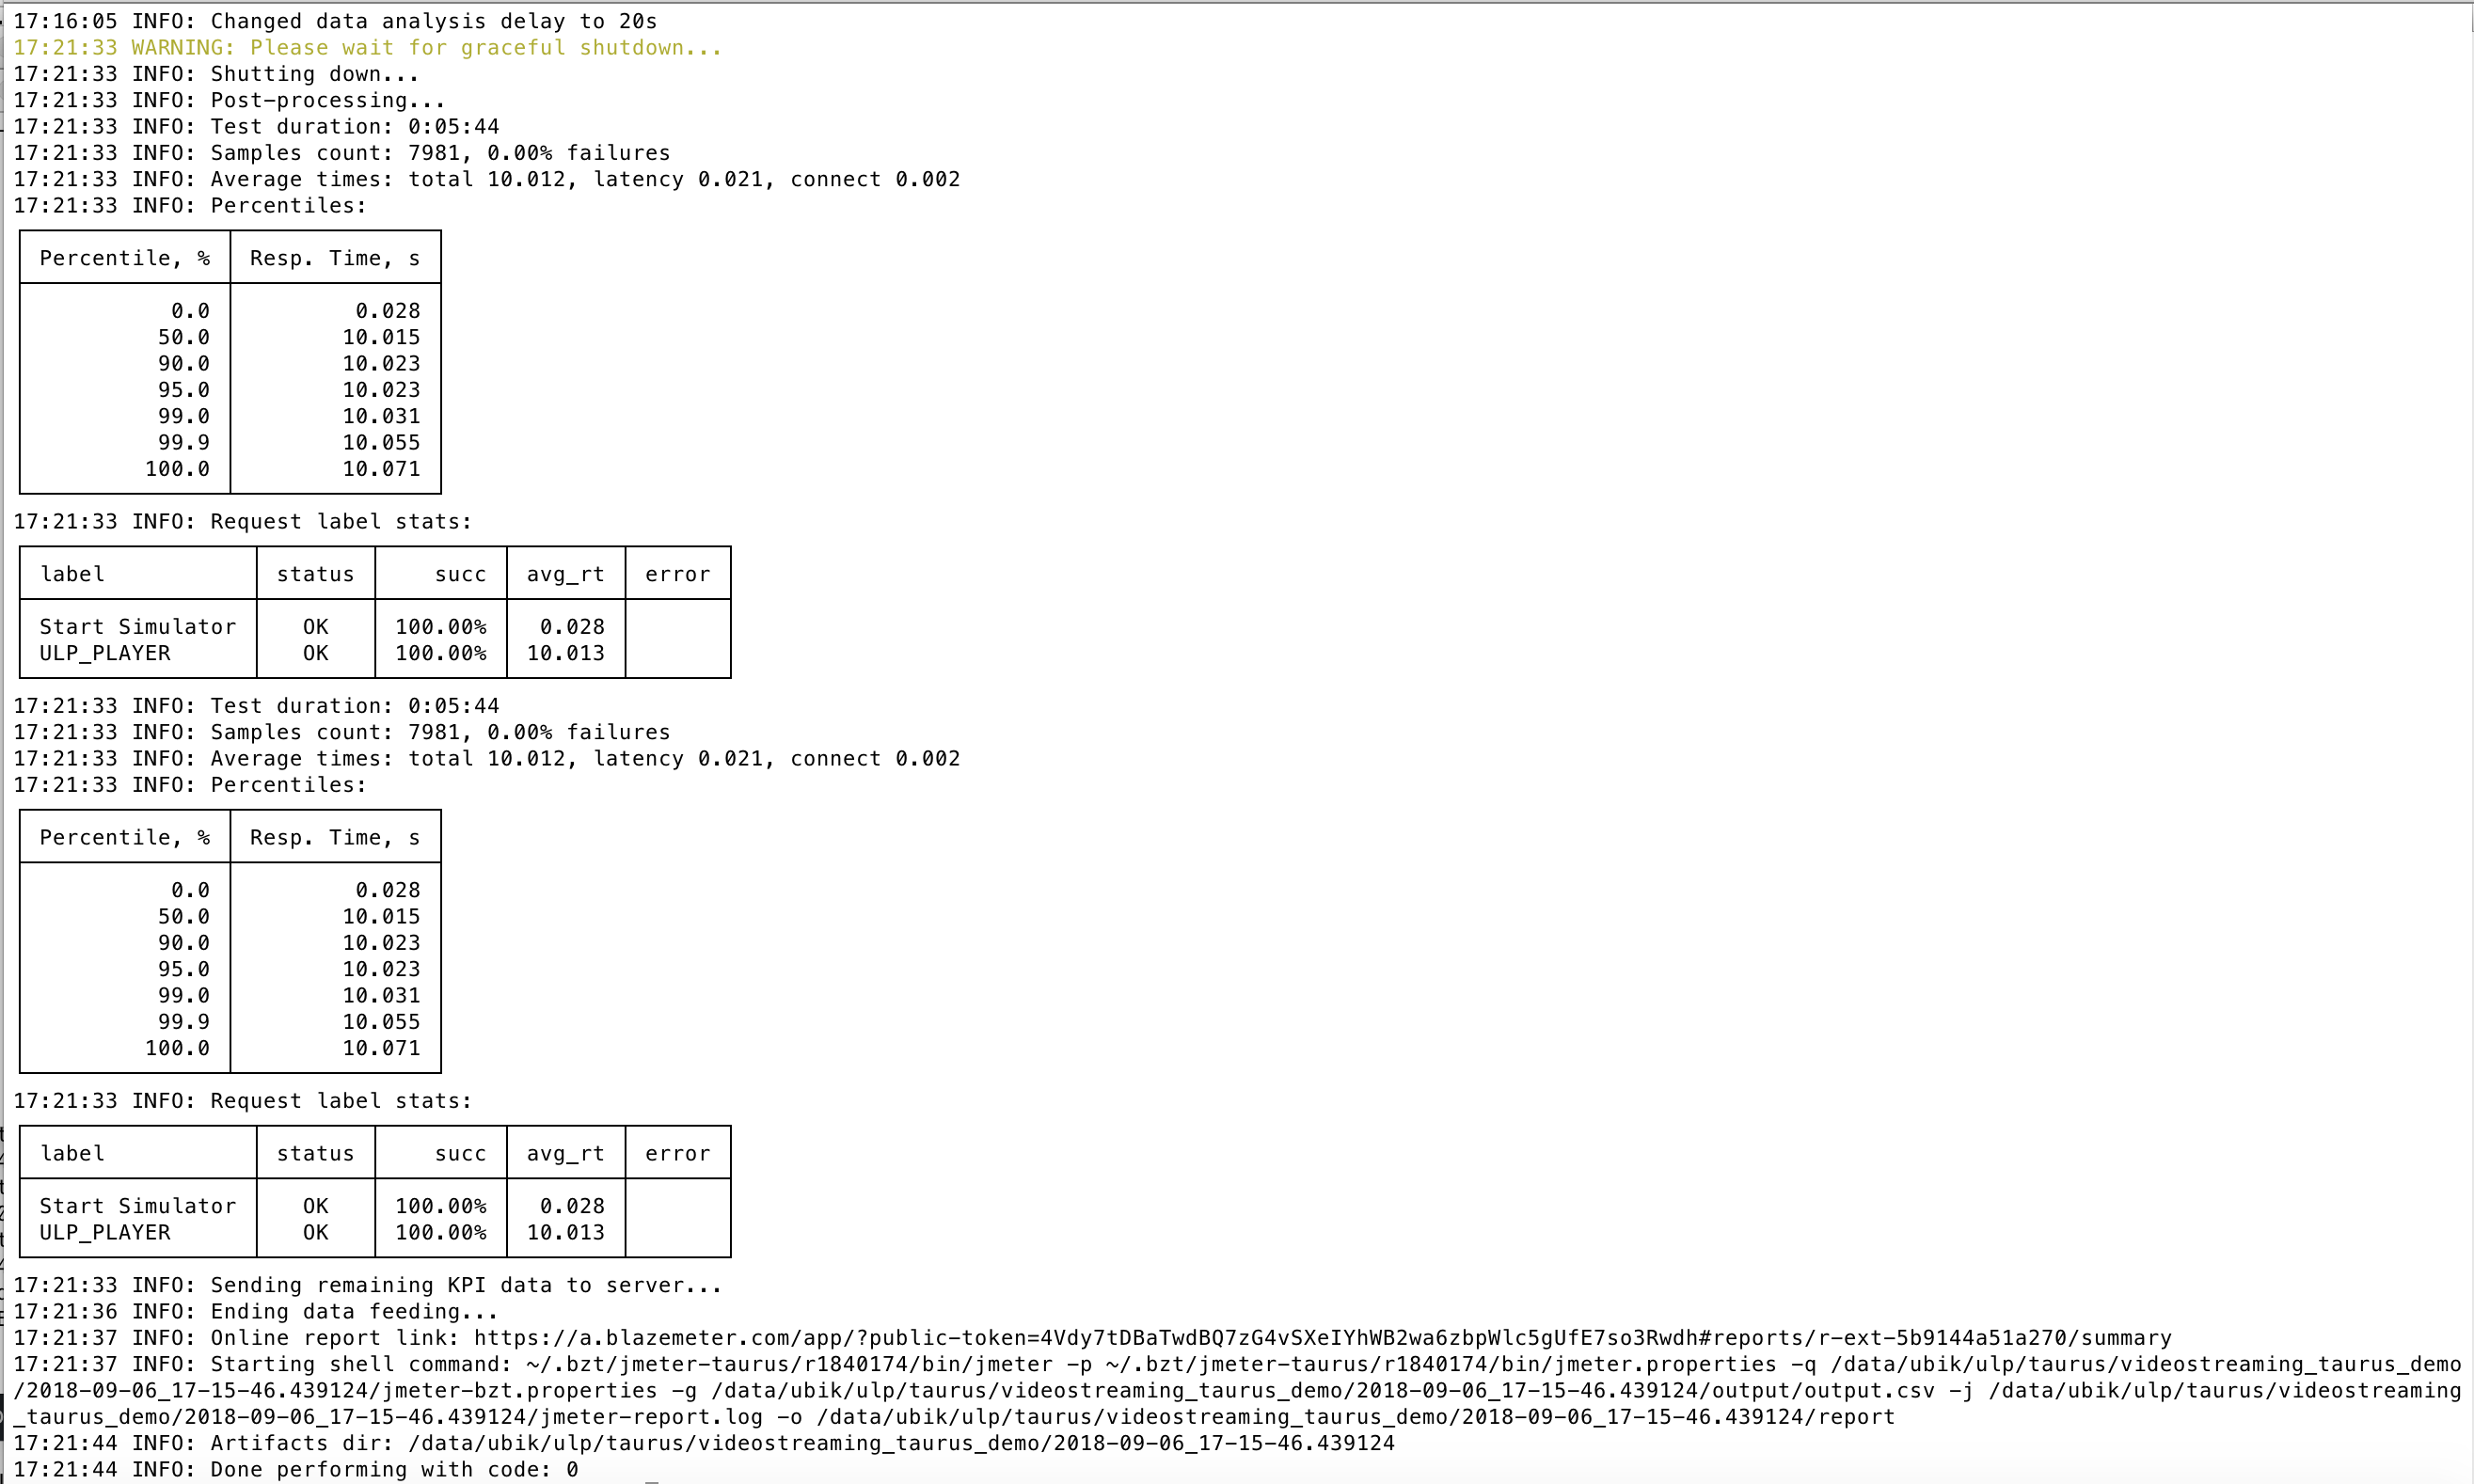
And when test ends, you can see a summary of response times (average and percentiles), error :
Report:
At the end, we have a JMeter HTML report generated with custom UbikLoadPack report in the output folder of Taurus in subfolder report.
Example for Average Chunk Response time:

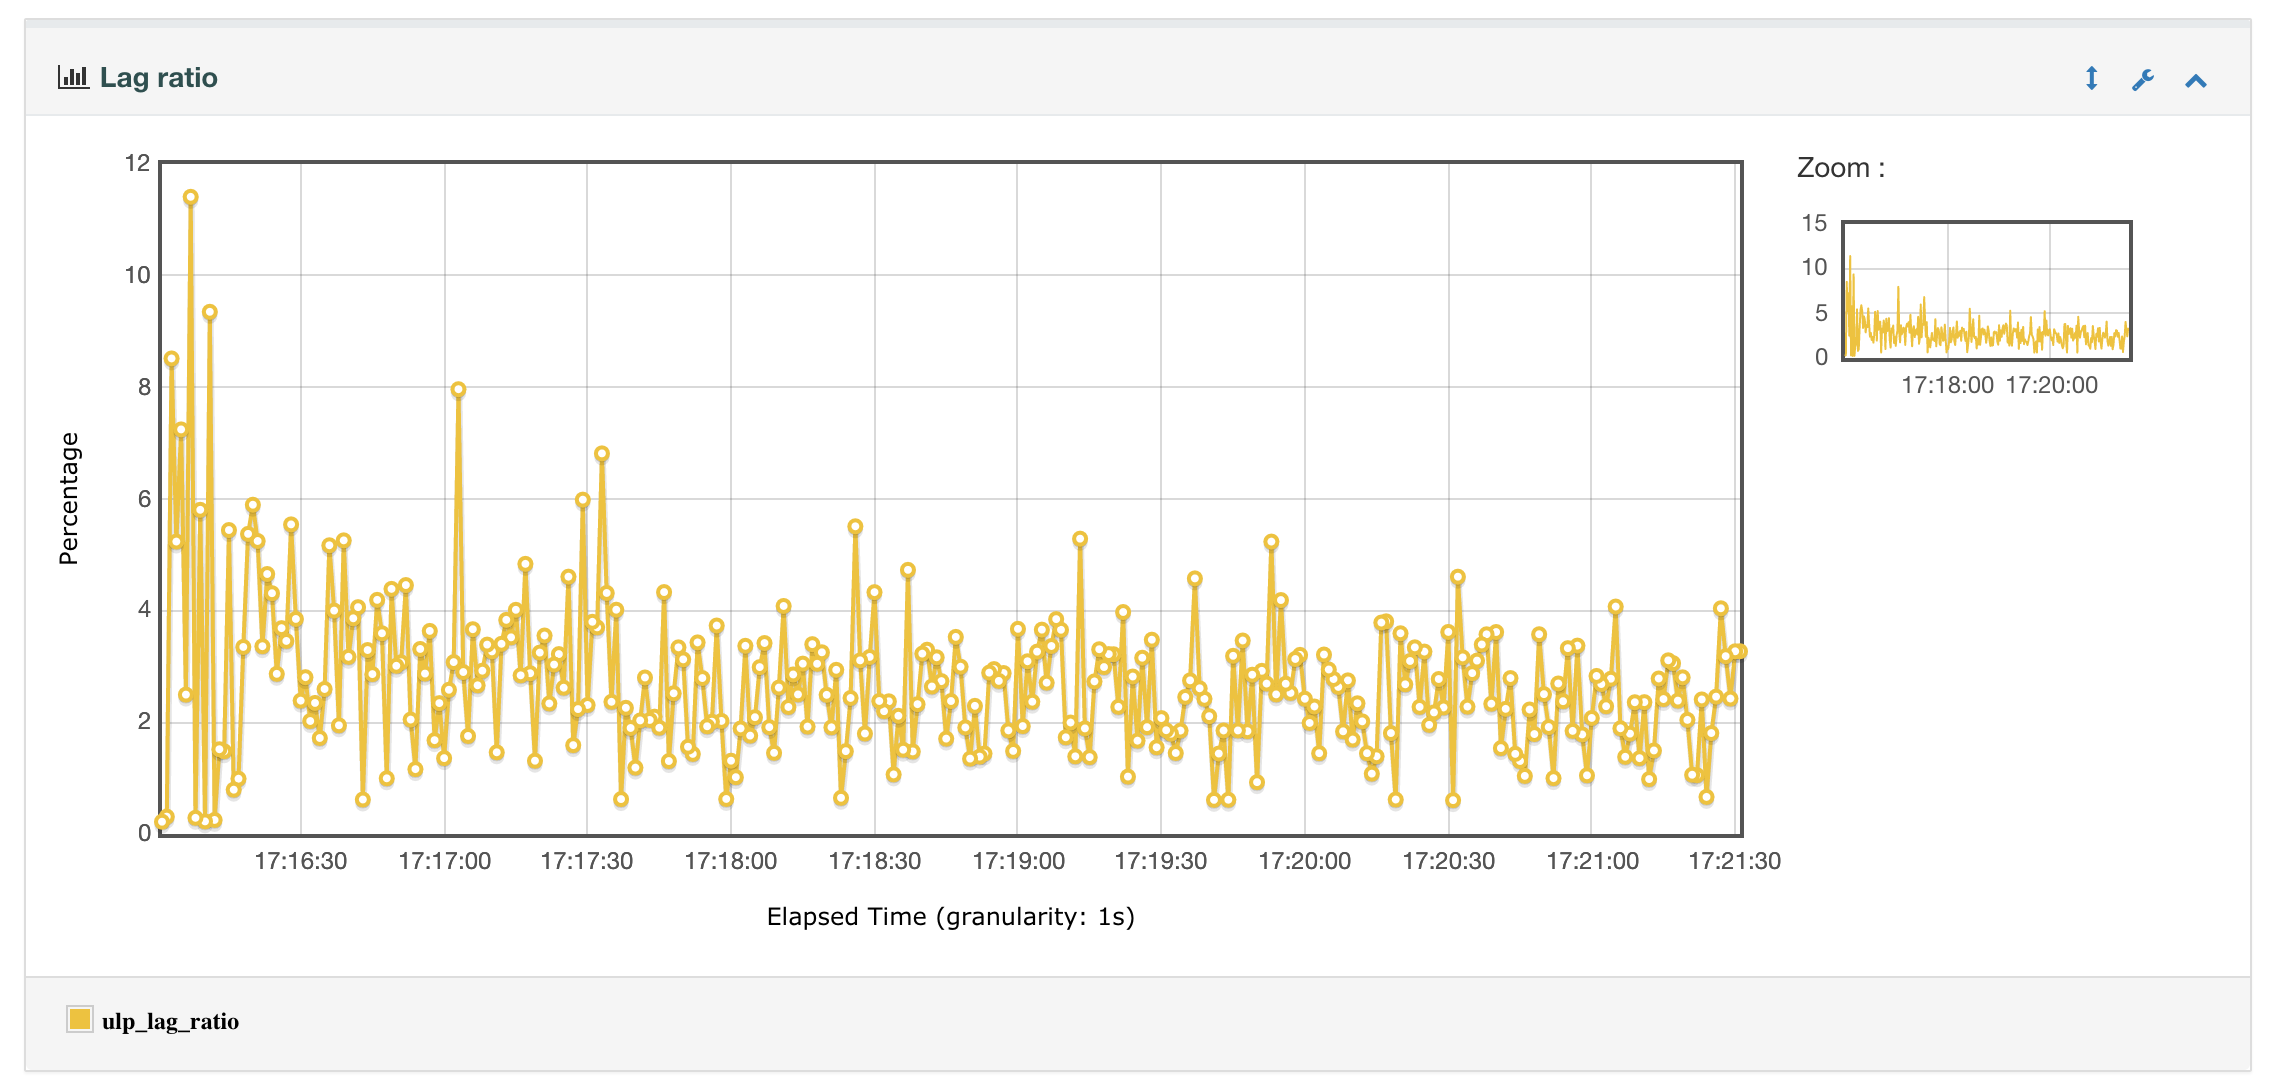
Example for Lag Ratio over time:
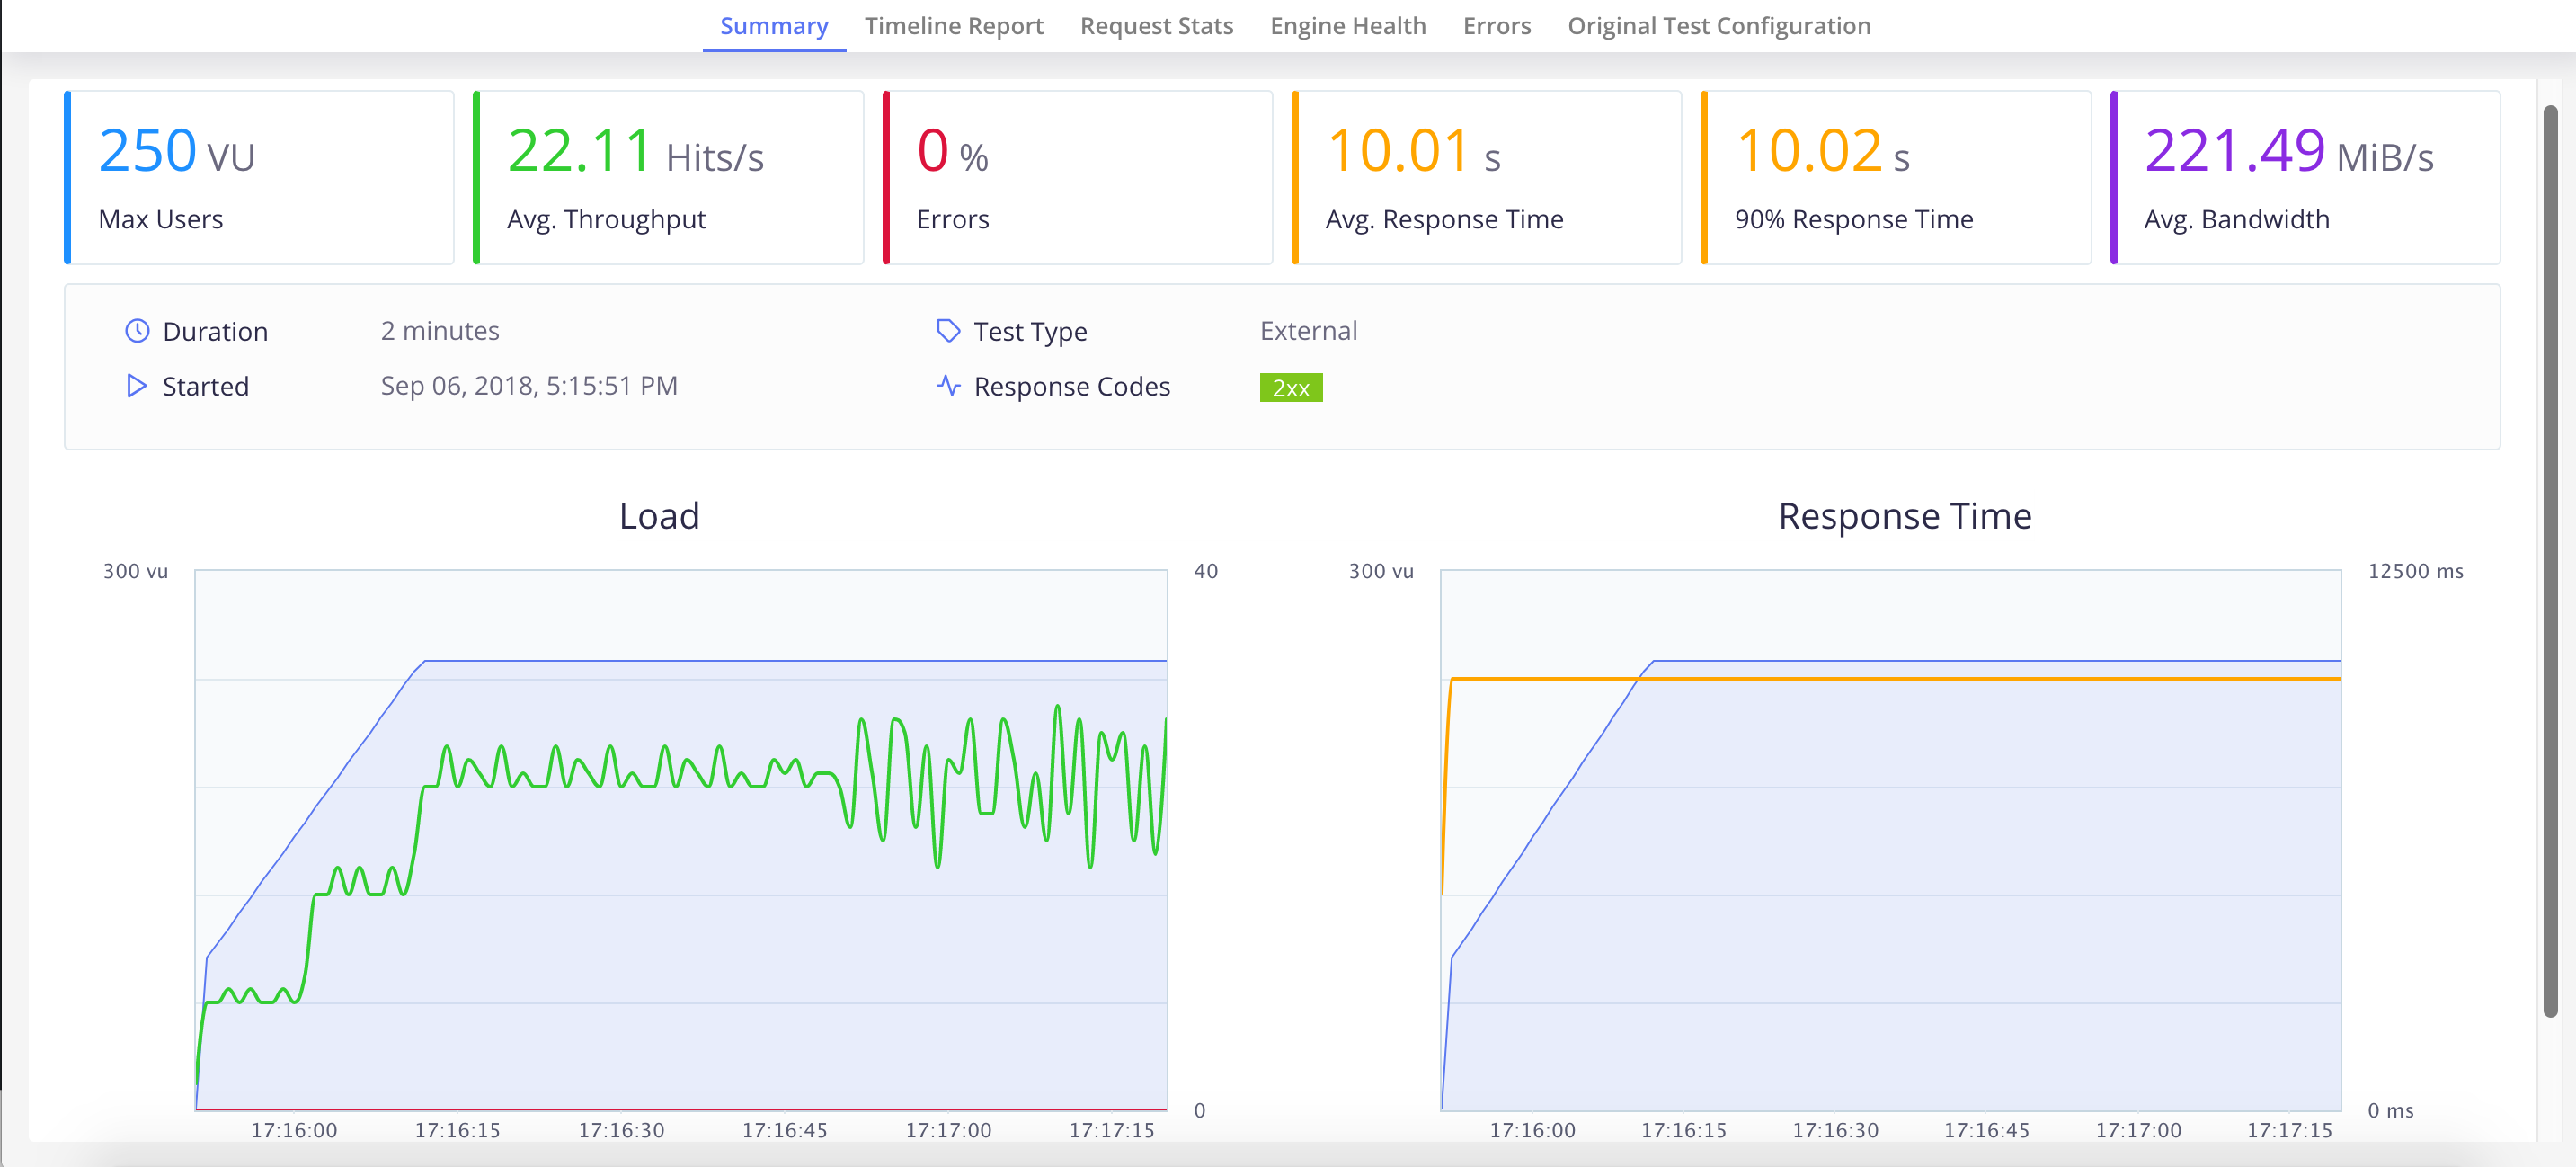
Note that Taurus provides a blazemeter reporting module that we use to follow test while it’s running and get the final report after the run.
Running the test and saving report to your Blazemeter account
If you have a Blazemeter account, then you can save the report to your account using the API.
In Blazemeter, go to Profile > Settings
Click on “API Keys” and click on generate, then copy the key at end of popup.
Then run:
bzt -o modules.blazemeter.token=”TOKEN KEY” ubikloadpack-vs.yml
Try it:
Request a trial version HERE.
Ask for a turnkey or consulting service at ubik-load-pack-sales@ubik-ingenierie.com.
About UbikLoadPack :

- Ubik Load Pack is used by Big players in the Video streaming field
- We provide professional services for Load Testing
- Learn more about our streaming plugin
- Detailed features of UbikLoadPack Streaming Solution
- Get a Free trial
You’ll probably also like :
UbikLoadPack solution

![]()

Publication
![]()
